Information scientists want a constant and reproducible atmosphere for machine studying (ML) and information science workloads that permits managing dependencies and is safe. AWS Deep Learning Containers already supplies pre-built Docker photographs for coaching and serving fashions in frequent frameworks comparable to TensorFlow, PyTorch, and MXNet. To enhance this expertise, we introduced a public beta of the SageMaker open-source distribution at 2023 JupyterCon. This supplies a unified end-to-end ML expertise throughout ML builders of various ranges of experience. Builders not want to modify between totally different framework containers for experimentation, or as they transfer from native JupyterLab environments and SageMaker notebooks to manufacturing jobs on SageMaker. The open-source SageMaker Distribution helps the most typical packages and libraries for information science, ML, and visualization, comparable to TensorFlow, PyTorch, Scikit-learn, Pandas, and Matplotlib. You can begin utilizing the container from the Amazon ECR Public Gallery beginning as we speak.
On this publish, we present you ways you should utilize the SageMaker open-source distribution to rapidly experiment in your native atmosphere and simply promote them to jobs on SageMaker.
Answer overview
For our instance, we showcase coaching a picture classification mannequin utilizing PyTorch. We use the KMNIST dataset out there publicly on PyTorch. We prepare a neural community mannequin, take a look at the mannequin’s efficiency, and eventually print the coaching and take a look at loss. The total pocket book for this instance is offered within the SageMaker Studio Lab examples repository. We begin experimentation on a neighborhood laptop computer utilizing the open-source distribution, transfer it to Amazon SageMaker Studio for utilizing a bigger occasion, after which schedule the pocket book as a pocket book job.
Stipulations
You want the next conditions:
Arrange your native atmosphere
You may instantly begin utilizing the open-source distribution in your native laptop computer. To begin JupyterLab, run the next instructions in your terminal:
You may substitute ECR_IMAGE_ID with any of the picture tags out there within the Amazon ECR Public Gallery, or select the latest-gpu tag in case you are utilizing a machine that helps GPU.
This command will begin JupyterLab and supply a URL on the terminal, like http://127.0.0.1:8888/lab?token=<token>. Copy the hyperlink and enter it in your most popular browser to start out JupyterLab.
Arrange Studio
Studio is an end-to-end built-in growth atmosphere (IDE) for ML that lets builders and information scientists construct, prepare, deploy, and monitor ML fashions at scale. Studio supplies an intensive listing of first-party photographs with frequent frameworks and packages, comparable to Information Science, TensorFlow, PyTorch, and Spark. These photographs make it easy for information scientists to get began with ML by merely selecting a framework and occasion kind of their selection for compute.
Now you can use the SageMaker open-source distribution on Studio utilizing Studio’s bring your own image characteristic. So as to add the open-source distribution to your SageMaker area, full the next steps:
- Add the open-source distribution to your account’s Amazon Elastic Container Registry (Amazon ECR) repository by operating the next instructions in your terminal:
- Create a SageMaker picture and connect the picture to the Studio area:
- On the SageMaker console, launch Studio by selecting your area and present person profile.
- Optionally, restart Studio by following the steps in Shut down and update SageMaker Studio.

Obtain the pocket book
Obtain the pattern pocket book regionally from the GitHub repo.
Open the pocket book in your selection of IDE and add a cell to the start of the pocket book to put in torchsummary. The torchsummary bundle just isn’t a part of the distribution, and putting in this on the pocket book will make sure the pocket book runs finish to finish. We advocate utilizing conda or micromamba to handle environments and dependencies. Add the next cell to the pocket book and save the pocket book:
Experiment on the native pocket book
Add the pocket book to the JupyterLab UI you launched by selecting the add icon as proven within the following screenshot.
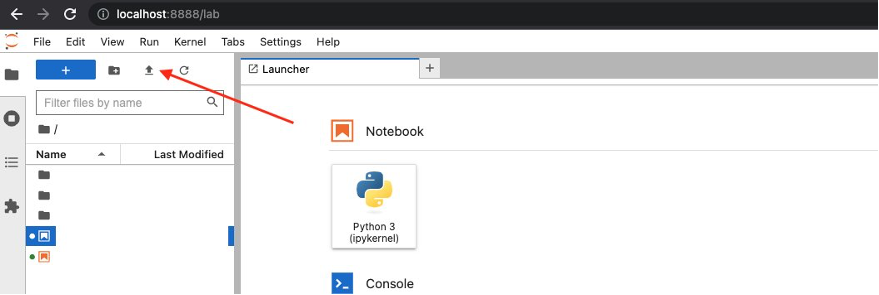
When it’s uploaded, launch the cv-kmnist.ipynb pocket book. You can begin operating the cells instantly, with out having to put in any dependencies comparable to torch, matplotlib, or ipywidgets.
When you adopted the previous steps, you may see that you should utilize the distribution regionally out of your laptop computer. Within the subsequent step, we use the identical distribution on Studio to make the most of Studio’s options.
Transfer the experimentation to Studio (non-obligatory)
Optionally, let’s promote the experimentation to Studio. One of many benefits of Studio is that the underlying compute sources are absolutely elastic, so you may simply dial the out there sources up or down, and the adjustments happen robotically within the background with out interrupting your work. When you wished to run the identical pocket book from earlier on a bigger dataset and compute occasion, you may migrate to Studio.
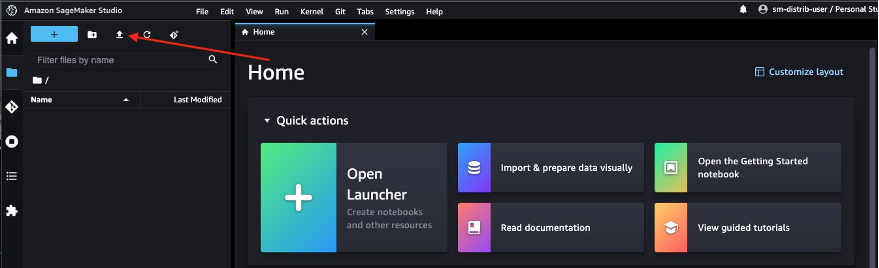
Navigate to the Studio UI you launched earlier and select the add icon to add the pocket book.
After you launch the pocket book, you may be prompted to decide on the picture and occasion kind. On the kernel launcher, select sagemaker-distribution because the picture and an ml.t3.medium occasion, then select Choose.

Now you can run the pocket book finish to finish without having any adjustments on the pocket book out of your native growth atmosphere to Studio notebooks!
Schedule the pocket book as a job
If you’re performed along with your experimentation, SageMaker supplies a number of choices to productionalize your pocket book, comparable to coaching jobs and SageMaker pipelines. One such choice is to instantly run the pocket book itself as a non-interactive, scheduled pocket book job utilizing SageMaker notebook jobs. For instance, you may wish to retrain your mannequin periodically, or get inferences on incoming information periodically and generate experiences for consumption by your stakeholders.
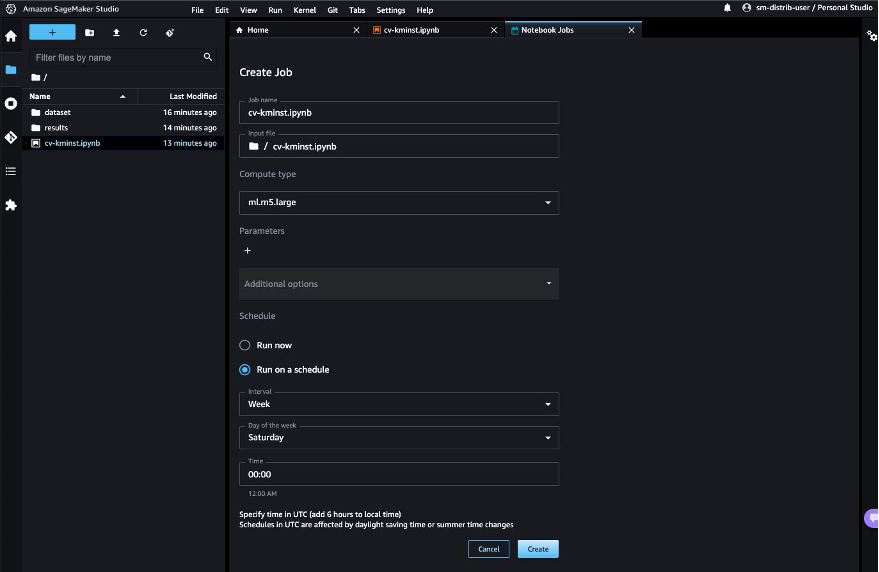
From Studio, select the pocket book job icon to launch the pocket book job. If in case you have put in the pocket book jobs extension regionally in your laptop computer, you may also schedule the pocket book instantly out of your laptop computer. See Installation Guide to arrange the pocket book jobs extension regionally.
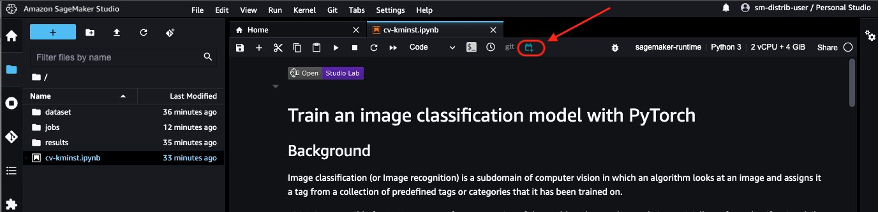
The pocket book job robotically makes use of the ECR picture URI of the open-source distribution, so you may instantly schedule the pocket book job.

Select Run on schedule, select a schedule, for instance each week on Saturday, and select Create. It’s also possible to select Run now in the event you’d wish to view the outcomes instantly.
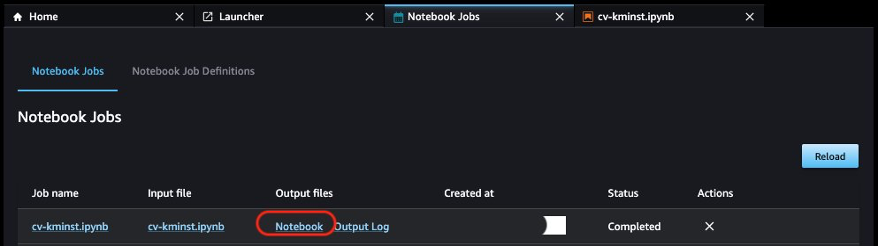
When the primary pocket book job is full, you may view the pocket book outputs instantly from the Studio UI by selecting Pocket book below Output recordsdata.
Extra concerns
Along with utilizing the publicly out there ECR picture instantly for ML workloads, the open-source distribution provides the next benefits:
- The Dockerfile used to construct the picture is offered publicly for builders to discover and construct their very own photographs. It’s also possible to inherit this picture as the bottom picture and set up your customized libraries to have a reproducible atmosphere.
- When you’re not used to Docker and like to make use of Conda environments in your JupyterLab atmosphere, we offer an
env.outfile for every of the revealed variations. You should use the directions within the file to create your individual Conda atmosphere that may mimic the identical atmosphere. For instance, see the CPU atmosphere file cpu.env.out. - You should use the GPU variations of the picture to run GPU-compatible workloads comparable to deep studying and picture processing.
Clear up
Full the next steps to scrub up your sources:
- If in case you have scheduled your pocket book to run on a schedule, pause or delete the schedule on the Pocket book Job Definitions tab to keep away from paying for future jobs.

- Shut down all Studio apps to keep away from paying for unused compute utilization. See Shut down and Update Studio Apps for directions.
- Optionally, delete the Studio area in the event you created one.

Conclusion
Sustaining a reproducible atmosphere throughout totally different phases of the ML lifecycle is among the greatest challenges for information scientists and builders. With the SageMaker open-source distribution, we offer a picture with mutually suitable variations of the most typical ML frameworks and packages. The distribution can be open supply, offering builders with transparency into the packages and construct processes, making it simpler to customise their very own distribution.
On this publish, we confirmed you use the distribution in your native atmosphere, on Studio, and because the container to your coaching jobs. This characteristic is presently in public beta. We encourage you to do that out and share your suggestions and points on the public GitHub repository!
In regards to the authors
 Durga Sury is an ML Options Architect on the Amazon SageMaker Service SA crew. She is keen about making machine studying accessible to everybody. In her 4 years at AWS, she has helped arrange AI/ML platforms for enterprise prospects. When she isn’t working, she loves bike rides, thriller novels, and lengthy walks along with her 5-year-old husky.
 Ketan Vijayvargiya is a Senior Software program Growth Engineer in Amazon Internet Providers (AWS). His focus areas are machine studying, distributed methods and open supply. Outdoors work, he likes to spend his time self-hosting and having fun with nature.