Amazon SageMaker Studio is the primary totally built-in improvement surroundings (IDE) for machine studying (ML). Studio offers a single web-based visible interface the place you possibly can carry out all ML improvement steps required to arrange knowledge, in addition to construct, prepare, and deploy fashions. Lifecycle configurations are shell scripts triggered by Studio lifecycle occasions, reminiscent of beginning a brand new Studio pocket book. You need to use lifecycle configurations to automate customization on your Studio surroundings. This customization consists of putting in customized packages, configuring pocket book extensions, preloading datasets, and organising supply code repositories. For instance, as an administrator for a Studio area, it’s possible you’ll need to save costs by having notebook apps shut down automatically after long periods of inactivity.
The AWS Cloud Development Kit (AWS CDK) is a framework for outlining cloud infrastructure via code and provisioning it via AWS CloudFormation stacks. A stack is a set of AWS assets that may be programmatically up to date, moved, or deleted. AWS CDK constructs are the constructing blocks of AWS CDK purposes, representing the blueprint to outline cloud architectures.
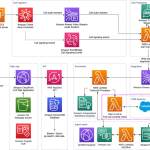
On this put up, we present the best way to use the AWS CDK to arrange Studio, use Studio lifecycle configurations, and allow its entry for knowledge scientists and builders in your group.
Resolution overview
The modularity of lifecycle configurations means that you can apply them to all customers in a website or to particular customers. This fashion, you possibly can arrange lifecycle configurations and reference them within the Studio kernel gateway or Jupyter server rapidly and constantly. The kernel gateway is the entry level to work together with a pocket book occasion, whereas the Jupyter server represents the Studio occasion. This allows you to apply DevOps greatest practices and meet security, compliance, and configuration requirements throughout all AWS accounts and Areas. For this put up, we use Python as the principle language, however the code could be simply modified to different AWS CDK supported languages. For extra info, confer with Working with the AWS CDK.
Conditions
To get began, ensure you have the next conditions:
Clone the GitHub repository
First, clone the GitHub repository.
As you clone the repository, you possibly can observe that we’ve got a traditional AWS CDK undertaking with the listing studio-lifecycle-config-construct, which comprises the assemble and assets required to create lifecycle configurations.
AWS CDK constructs
The file we need to examine is aws_sagemaker_lifecycle.py. This file comprises the SageMakerStudioLifeCycleConfig assemble we use to arrange and create lifecycle configurations.
The SageMakerStudioLifeCycleConfig assemble offers the framework for constructing lifecycle configurations utilizing a customized AWS Lambda perform and shell code learn in from a file. The assemble comprises the next parameters:
- ID – The identify of the present undertaking.
- studio_lifecycle_content – The base64 encoded content material.
- studio_lifecycle_tags – Labels you assign to arrange Amazon assets. They’re inputted as key-value pairs and are optionally available for this configuration.
- studio_lifecycle_config_app_type –
JupyterServeris for the distinctive server itself, and theKernelGatewayapp corresponds to a operating SageMaker picture container.
For extra info on the Studio pocket book structure, confer with Dive deep into Amazon SageMaker Studio Notebooks architecture.
The next is a code snippet of the Studio lifecycle config assemble (aws_sagemaker_lifecycle.py):
After you import and set up the assemble, you should utilize it. The next code snippet exhibits the best way to create a lifecycle config utilizing the assemble in a stack both in app.py or one other assemble:
Deploy AWS CDK constructs
To deploy your AWS CDK stack, run the next instructions within the location the place you cloned the repository.
The command could also be python as a substitute of python3 relying in your path configurations.
- Create a digital surroundings:
- For macOS/Linux, use
python3 -m venv .cdk-venv. - For Home windows, use
python3 -m venv .cdk-venv.
- For macOS/Linux, use
- Activate the digital surroundings:
- For macOS/Linux, use
supply .cdk-venvbinactivate. - For Home windows, use
.cdk-venv/Scripts/activate.bat. - For PowerShell, use
.cdk-venv/Scripts/activate.ps1.
- For macOS/Linux, use
- Set up the required dependencies:
pip set up -r necessities.txtpip set up -r requirements-dev.txt
- At this level, you possibly can optionally synthesize the CloudFormation template for this code:
- Deploy the answer with the next instructions:
aws configurecdk bootstrapcdk deploy
When the stack is efficiently deployed, it’s best to have the ability to view the stack on the CloudFormation console.

Additionally, you will have the ability to view the lifecycle configuration on the SageMaker console.

Select the lifecycle configuration to view the shell code that runs in addition to any tags you assigned.

Connect the Studio lifecycle configuration
There are a number of methods to connect a lifecycle configuration. On this part, we current two strategies: utilizing the AWS Management Console, and programmatically utilizing the infrastructure supplied.
Connect the lifecycle configuration utilizing the console
To make use of the console, full the next steps:
- On the SageMaker console, select Domains within the navigation pane.
- Select the area identify you’re utilizing and the present person profile, then select Edit.
- Choose the lifecycle configuration you need to use and select Connect.
From right here, you can too set it as default.

Connect the lifecycle configuration programmatically
It’s also possible to retrieve the ARN of the Studio lifecycle configuration created by the assemble’s and connect it to the Studio assemble programmatically. The next code exhibits the lifecycle configuration ARN being handed to a Studio assemble:
Clear up
Full the steps on this part to scrub up your assets.
Delete the Studio lifecycle configuration
To delete your lifecycle configuration, full the next steps:
- On the SageMaker console, select Studio lifecycle configurations within the navigation pane.
- Choose the lifecycle configuration, then select Delete.

Delete the AWS CDK stack
If you’re performed with the assets you created, you possibly can destroy your AWS CDK stack by operating the next command within the location the place you cloned the repository:
When requested to verify the deletion of the stack, enter sure.
It’s also possible to delete the stack on the AWS CloudFormation console with the next steps:
- On the AWS CloudFormation console, select Stacks within the navigation pane.
- Select the stack that you simply need to delete.
- Within the stack particulars pane, select Delete.
- Select Delete stack when prompted.
In case you run into any errors, you could have to manually delete some assets relying in your account configuration.
Conclusion
On this put up, we mentioned how Studio serves as an IDE for ML workloads. Studio presents lifecycle configuration help, which lets you arrange customized shell scripts to carry out automated duties, or arrange improvement environments at launch. We used AWS CDK constructs to construct the infrastructure for the customized useful resource and lifecycle configuration. Constructs are synthesized into CloudFormation stacks which are then deployed to create the customized useful resource and lifecycle script that’s utilized in Studio and the pocket book kernel.
For extra info, go to Amazon SageMaker Studio.
In regards to the Authors
 Cory Hairston is a Software program Engineer with the Amazon ML Options Lab. He at the moment works on offering reusable software program options.
 Alex Chirayath is a Senior Machine Studying Engineer on the Amazon ML Options Lab. He leads groups of knowledge scientists and engineers to construct AI purposes to deal with enterprise wants.
 Gouri Pandeshwar is an Engineer Supervisor on the Amazon ML Options Lab. He and his group of engineers are working to construct reusable options and frameworks that assist speed up adoption of AWS AI/ML providers for purchasers’ enterprise use circumstances.