
If you’re a enterprise analyst, understanding buyer conduct might be one of the vital necessary belongings you care about. Understanding the explanations and mechanisms behind buyer buy selections can facilitate income progress. Nevertheless, the lack of prospects (generally known as buyer churn) all the time poses a danger. Gaining insights into why prospects depart could be simply as essential for sustaining income and income.
Though machine studying (ML) can present worthwhile insights, ML specialists had been wanted to construct buyer churn prediction fashions till the introduction of Amazon SageMaker Canvas.
SageMaker Canvas is a low-code/no-code managed service that means that you can create ML fashions that may resolve many enterprise issues with out writing a single line of code. It additionally lets you consider the fashions utilizing superior metrics as when you had been an information scientist.
On this submit, we present how a enterprise analyst can consider and perceive a classification churn mannequin created with SageMaker Canvas utilizing the Superior metrics tab. We clarify the metrics and present methods to cope with information to acquire higher mannequin efficiency.
Conditions
If you need to implement all or a number of the duties described on this submit, you want an AWS account with entry to SageMaker Canvas. Confer with Predict customer churn with no-code machine learning using Amazon SageMaker Canvas to cowl the fundamentals round SageMaker Canvas, the churn mannequin, and the dataset.
Introduction to mannequin efficiency analysis
As a basic guideline, when it is advisable consider the efficiency of a mannequin, you’re making an attempt to measure how properly the mannequin will predict one thing when it sees new information. This prediction known as inference. You begin by coaching the mannequin utilizing present information, after which ask the mannequin to foretell the result on information that it has not already seen. How precisely the mannequin predicts this end result is what you have a look at to grasp the mannequin efficiency.
If the mannequin hasn’t seen the brand new information, how would anyone know if the prediction is sweet or unhealthy? Effectively, the concept is to really use historic information the place the outcomes are already identified and evaluate the these values to the mannequin’s predicted values. That is enabled by setting apart a portion of the historic coaching information so it may be in contrast with what the mannequin predicts for these values.
Within the instance of buyer churn (which is a categorical classification drawback), you begin with a historic dataset that describes prospects with many attributes (one in every file). One of many attributes, referred to as Churn, could be True or False, describing if the client left the service or not. To judge mannequin accuracy, we break up this dataset and prepare the mannequin utilizing one half (the coaching dataset), and ask the mannequin to foretell the result (classify the client as Churn or not) with the opposite half (the check dataset). We then evaluate the mannequin’s prediction to the bottom reality contained within the check dataset.
Deciphering superior metrics
On this part, we talk about the superior metrics in SageMaker Canvas that may enable you perceive mannequin efficiency.
Confusion matrix
SageMaker Canvas makes use of confusion matrices that can assist you visualize when a mannequin generates predictions appropriately. In a confusion matrix, your outcomes are organized to check the expected values in opposition to the precise historic (identified) values. The next instance explains how a confusion matrix works for a two-category prediction mannequin that predicts optimistic and detrimental labels:
- True optimistic – The mannequin appropriately predicted optimistic when the true label was optimistic
- True detrimental – The mannequin appropriately predicted detrimental when the true label was detrimental
- False optimistic – The mannequin incorrectly predicted optimistic when the true label was detrimental
- False detrimental – The mannequin incorrectly predicted detrimental when the true label was optimistic
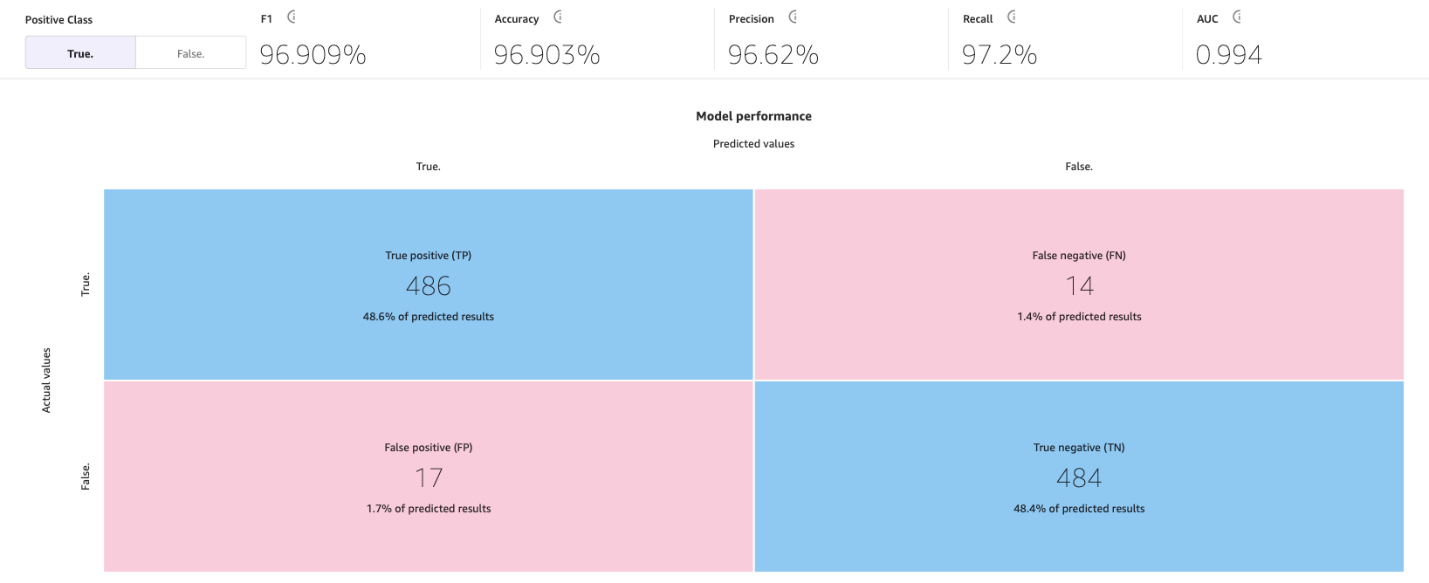
The next picture is an instance of a confusion matrix for 2 classes. In our churn mannequin, the precise values come from the check dataset, and the expected values come from asking our mannequin.
Accuracy
Accuracy is the proportion of right predictions out of all of the rows or samples of the check set. It’s the true samples that had been predicted as True, plus the false samples that had been appropriately predicted as False, divided by the full variety of samples within the dataset.
It’s one of the vital necessary metrics to grasp as a result of it’s going to let you know in what share the mannequin appropriately predicted, however it may be deceptive in some instances. For instance:
- Class imbalance – When the courses in your dataset are usually not evenly distributed (you’ve a disproportionate variety of samples from one class and little or no on others), accuracy could be deceptive. In such instances, even a mannequin that merely predicts the bulk class for each occasion can obtain a excessive accuracy.
- Value-sensitive classification – In some purposes, the price of misclassification for various courses could be completely different. For instance, if we had been predicting if a drug can irritate a situation, a false detrimental (for instance, predicting the drug won’t irritate when it really does) could be extra expensive than a false optimistic (for instance, predicting the drug may irritate when it really doesn’t).
Precision, recall, and F1 rating
Precision is the fraction of true positives (TP) out of all the expected positives (TP + FP). It measures the proportion of optimistic predictions which are really right.
Recall is the fraction of true positives (TP) out of all of the precise positives (TP + FN). It measures the proportion of optimistic situations that had been appropriately predicted as optimistic by the mannequin.
The F1 rating combines precision and recall to offer a single rating that balances the trade-off between them. It’s outlined because the harmonic imply of precision and recall:
F1 rating = 2 * (precision * recall) / (precision + recall)
The F1 rating ranges from 0–1, with a better rating indicating higher efficiency. An ideal F1 rating of 1 signifies that the mannequin has achieved each good precision and excellent recall, and a rating of 0 signifies that the mannequin’s predictions are fully unsuitable.
The F1 rating gives a balanced analysis of the mannequin’s efficiency. It considers precision and recall, offering a extra informative analysis metric that displays the mannequin’s means to appropriately classify optimistic situations and keep away from false positives and false negatives.
For instance, in medical prognosis, fraud detection, and sentiment evaluation, F1 is very related. In medical prognosis, precisely figuring out the presence of a particular illness or situation is essential, and false negatives or false positives can have important penalties. The F1 rating takes into consideration each precision (the power to appropriately determine optimistic instances) and recall (the power to seek out all optimistic instances), offering a balanced analysis of the mannequin’s efficiency in detecting the illness. Equally, in fraud detection, the place the variety of precise fraud instances is comparatively low in comparison with non-fraudulent instances (imbalanced courses), accuracy alone could also be deceptive as a consequence of a excessive variety of true negatives. The F1 rating gives a complete measure of the mannequin’s means to detect each fraudulent and non-fraudulent instances, contemplating each precision and recall. And in sentiment evaluation, if the dataset is imbalanced, accuracy could not precisely replicate the mannequin’s efficiency in classifying situations of the optimistic sentiment class.
AUC (space beneath the curve)
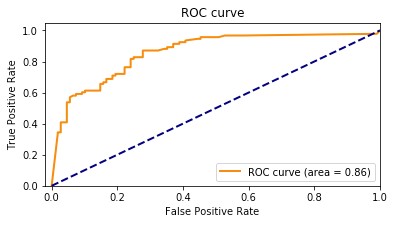
The AUC metric evaluates the power of a binary classification mannequin to tell apart between optimistic and detrimental courses in any respect classification thresholds. A threshold is a worth utilized by the mannequin to decide between the 2 potential courses, changing the chance of a pattern being a part of a category right into a binary choice. To calculate the AUC, the true optimistic charge (TPR) and false optimistic charge (FPR) are plotted throughout numerous threshold settings. The TPR measures the proportion of true positives out of all precise positives, whereas the FPR measures the proportion of false positives out of all precise negatives. The ensuing curve, referred to as the receiver working attribute (ROC) curve, gives a visible illustration of the TPR and FPR at completely different threshold settings. The AUC worth, which ranges from 0–1, represents the realm beneath the ROC curve. Increased AUC values point out higher efficiency, with an ideal classifier attaining an AUC of 1.
The next plot reveals the ROC curve, with TPR because the Y axis and FPR because the X axis. The nearer the curve will get to the highest left nook of the plot, the higher the mannequin does at classifying the info into classes.
To make clear, let’s go over an instance. Let’s take into consideration a fraud detection mannequin. Normally, these fashions are skilled from unbalanced datasets. This is because of the truth that, often, virtually all of the transactions within the dataset are non-fraudulent with just a few labeled as frauds. On this case, the accuracy alone could not adequately seize the efficiency of the mannequin as a result of it’s most likely closely influenced by the abundance of non-fraudulent instances, resulting in misleadingly excessive accuracy scores.
On this case, the AUC can be a greater metric to evaluate mannequin efficiency as a result of it gives a complete evaluation of a mannequin’s means to tell apart between fraudulent and non-fraudulent transactions. It provides a extra nuanced analysis, taking into consideration the trade-off between true optimistic charge and false optimistic charge at numerous classification thresholds.
Identical to the F1 rating, it’s notably helpful when the dataset is imbalanced. It measures the trade-off between TPR and FPR and reveals how properly the mannequin can differentiate between the 2 courses no matter their distribution. Which means even when one class is considerably smaller than the opposite, the ROC curve assesses the mannequin’s efficiency in a balanced method by contemplating each courses equally.
Extra key subjects
Superior metrics are usually not the one necessary instruments accessible to you for evaluating and bettering ML mannequin efficiency. Knowledge preparation, function engineering, and have impression evaluation are methods which are important to mannequin constructing. These actions play an important position in extracting significant insights from uncooked information and bettering mannequin efficiency, resulting in extra sturdy and insightful outcomes.
Knowledge preparation and have engineering
Function engineering is the method of choosing, remodeling, and creating new variables (options) from uncooked information, and performs a key position in bettering the efficiency of an ML mannequin. Choosing probably the most related variables or options from the accessible information entails eradicating irrelevant or redundant options that don’t contribute to the mannequin’s predictive energy. Remodeling information options into an appropriate format contains scaling, normalization, and dealing with lacking values. And eventually, creating new options from the present information is finished by means of mathematical transformations, combining or interacting completely different options, or creating new options from domain-specific data.
Function significance evaluation
SageMaker Canvas generates a function significance evaluation that explains the impression that every column in your dataset has on the mannequin. If you generate predictions, you’ll be able to see the column impression that identifies which columns have probably the most impression on every prediction. This gives you insights on which options need to be a part of your ultimate mannequin and which of them needs to be discarded. Column impression is a share rating that signifies how a lot weight a column has in making predictions in relation to the opposite columns. For a column impression of 25%, Canvas weighs the prediction as 25% for the column and 75% for the opposite columns.
Approaches to enhance mannequin accuracy
Though there are a number of strategies to enhance mannequin accuracy, information scientists and ML practitioners often comply with one of many two approaches mentioned on this part, utilizing the instruments and metrics described earlier.
Mannequin-centric method
On this method, the info all the time stays the identical and is used to iteratively enhance the mannequin to fulfill desired outcomes. Instruments used with this method embrace:
- Making an attempt a number of related ML algorithms
- Algorithm and hyperparameter tuning and optimization
- Totally different mannequin ensemble strategies
- Utilizing pre-trained fashions (SageMaker gives numerous built-in or pre-trained models to assist ML practitioners)
- AutoML, which is what SageMaker Canvas does behind the scenes (utilizing Amazon SageMaker Autopilot), which encompasses all the above
Knowledge-centric method
On this method, the main target is on information preparation, bettering information high quality, and iteratively modifying the info to enhance efficiency:
- Exploring statistics of the dataset used to coach the mannequin, often known as exploratory information evaluation (EDA)
- Enhancing information high quality (information cleansing, lacking values imputation, outlier detection and administration)
- Function choice
- Function engineering
- Knowledge augmentation
Enhancing mannequin efficiency with Canvas
We start with the data-centric method. We use the mannequin preview performance to carry out an preliminary EDA. This gives us a baseline that we will use to carry out information augmentation, producing a brand new baseline, and at last getting one of the best mannequin with a model-centric method utilizing the usual construct performance.
We use the synthetic dataset from a telecommunications cell phone service. This pattern dataset incorporates 5,000 data, the place every file makes use of 21 attributes to explain the client profile. Confer with Predict customer churn with no-code machine learning using Amazon SageMaker Canvas for a full description.
Mannequin preview in a data-centric method
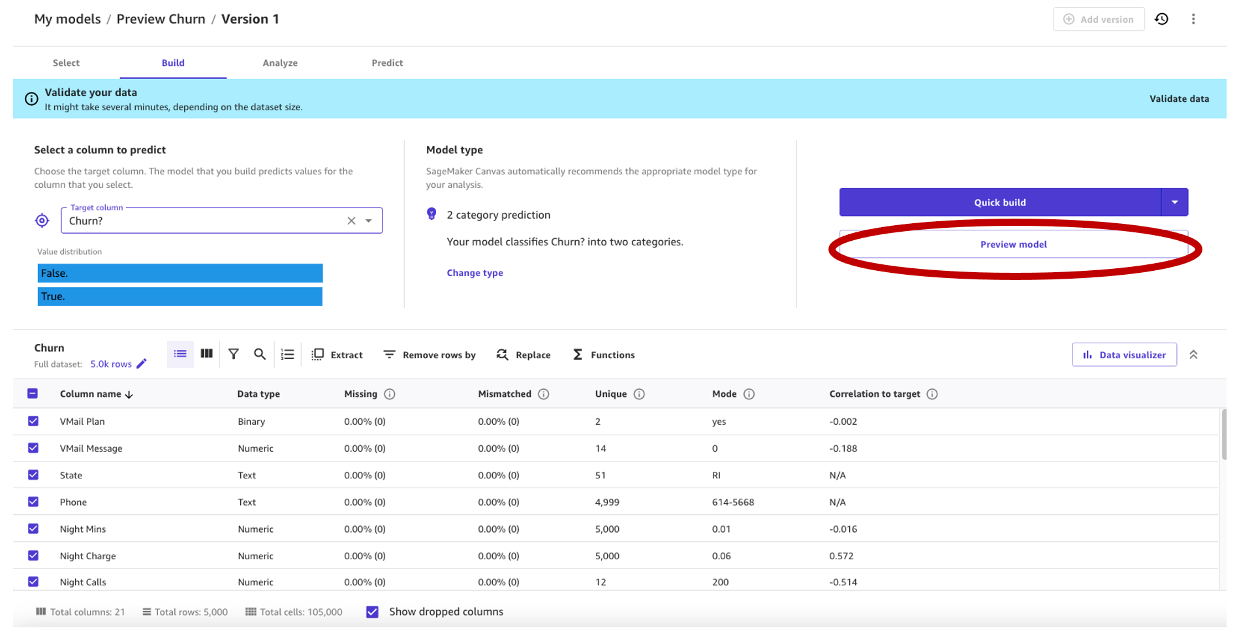
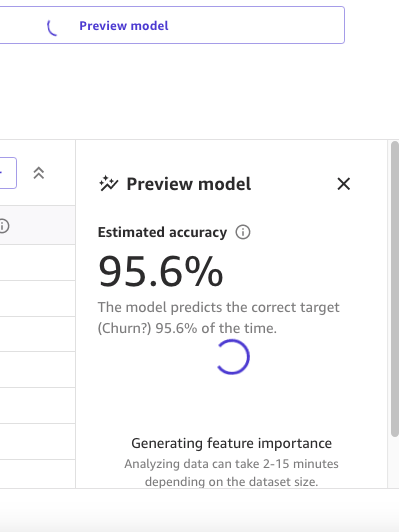
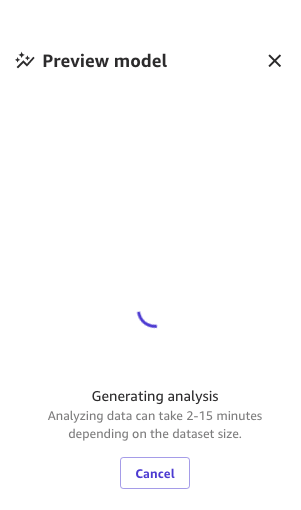
As a primary step, we open the dataset, choose the column to foretell as Churn?, and generate a preview mannequin by selecting Preview mannequin.
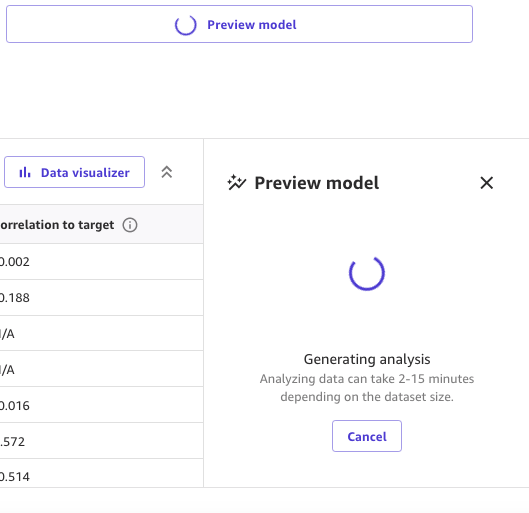
The Preview mannequin pane will present the progress till the preview mannequin is prepared.
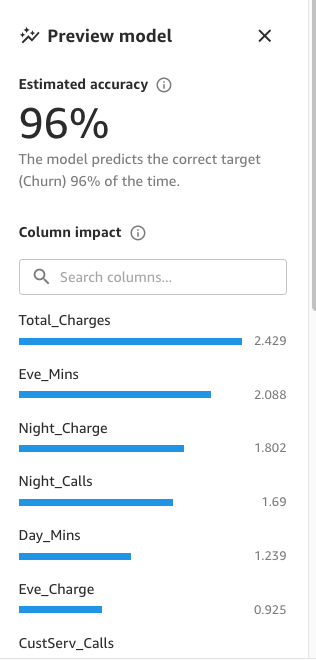
When the mannequin is prepared, SageMaker Canvas generates a function significance evaluation.
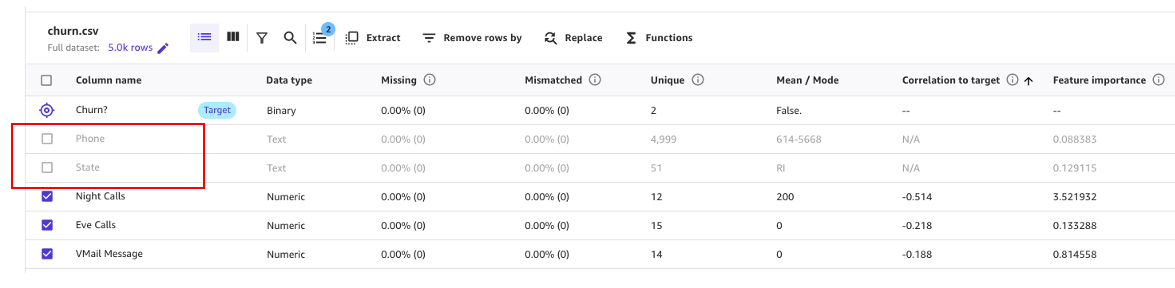
Lastly, when it’s full, the pane will present an inventory of columns with its impression on the mannequin. These are helpful to grasp how related the options are on our predictions. Column impression is a share rating that signifies how a lot weight a column has in making predictions in relation to the opposite columns. Within the following instance, for the Night time Calls column, SageMaker Canvas weights the prediction as 4.04% for the column and 95.9% for the opposite columns. The upper the worth, the upper the impression.
As we will see, the preview mannequin has a 95.6% accuracy. Let’s attempt to enhance the mannequin efficiency utilizing a data-centric method. We carry out information preparation and use function engineering methods to enhance efficiency.
As proven within the following screenshot, we will observe that the Cellphone and State columns have a lot much less impression on our prediction. Due to this fact, we’ll use this info as enter for our subsequent section, information preparation.

SageMaker Canvas gives ML information transforms with which you’ll clear, rework, and put together your information for mannequin constructing. You should use these transforms in your datasets with none code, and they are going to be added to the mannequin recipe, which is a file of the info preparation carried out in your information earlier than constructing the mannequin.
Be aware that any information transforms you employ solely modify the enter information when constructing a mannequin and don’t modify your dataset or unique information supply.
The next transforms can be found in SageMaker Canvas so that you can put together your information for constructing:
- Datetime extraction
- Drop columns
- Filter rows
- Features and operators
- Handle rows
- Rename columns
- Take away rows
- Change values
- Resample time sequence information
Let’s begin by dropping the columns we now have discovered which have little impression on our prediction.
For instance, on this dataset, the telephone quantity is simply the equal of an account quantity—it’s ineffective and even detrimental in predicting different accounts’ chance of churn. Likewise, the client’s state doesn’t impression our mannequin a lot. Let’s take away the Cellphone and State columns by unselecting these options beneath Column identify.
Now, let’s carry out some extra information transformation and have engineering.
For instance, we seen in our earlier evaluation that the charged quantity to prospects has a direct impression on churn. Let’s subsequently create a brand new column that computes the full fees to our prospects by combining Cost, Minutes, and Requires Day, Eve, Night time, and Intl. To take action, we use the customized formulation in SageMaker Canvas.
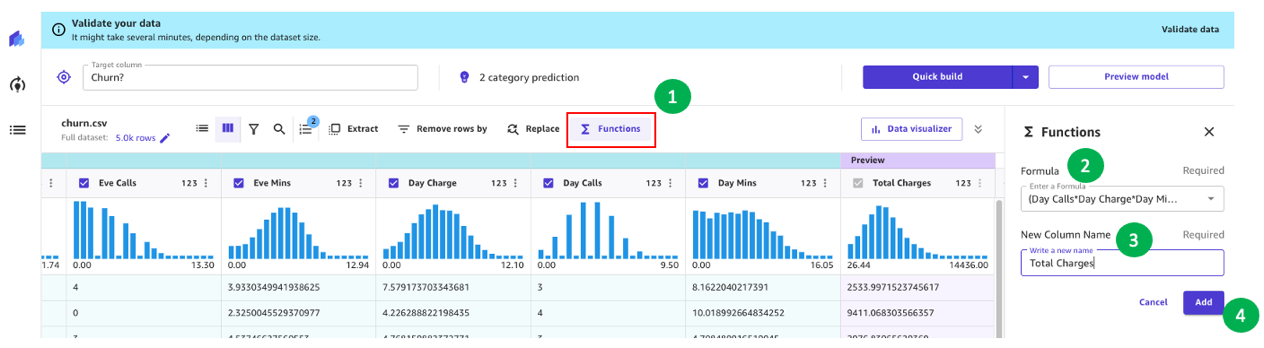
Let’s begin by selecting Features, then we add to the system textbox the next textual content:
(Day Calls*Day Cost*Day Minutes)+(Eve Calls*Eve Cost*Eve Minutes)+(Night time Calls*Night time Cost*Night time Minutes)+(Intl Calls*Intl Cost*Intl Minutes)
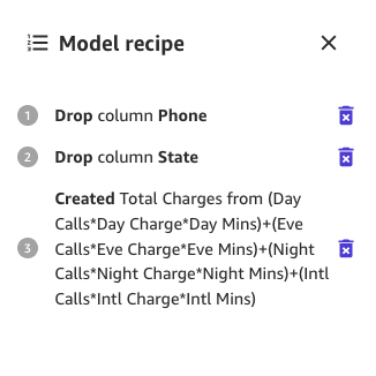
Give the brand new column a reputation (for instance, Complete Fees), and select Add after the preview has been generated. The mannequin recipe ought to now look as proven within the following screenshot.
When this information preparation is full, we prepare a brand new preview mannequin to see if the mannequin improved. Select Preview mannequin once more, and the decrease proper pane will present the progress.
When coaching is completed, it’s going to proceed to recompute the expected accuracy, and also will create a brand new column impression evaluation.

And eventually, when the entire course of is full, we will see the identical pane we noticed earlier however with the brand new preview mannequin accuracy. You may discover mannequin accuracy elevated by 0.4% (from 95.6% to 96%).
The numbers within the previous photographs could differ from yours as a result of ML introduces some stochasticity within the course of of coaching fashions, which might result in completely different ends in completely different builds.
Mannequin-centric method to create the mannequin
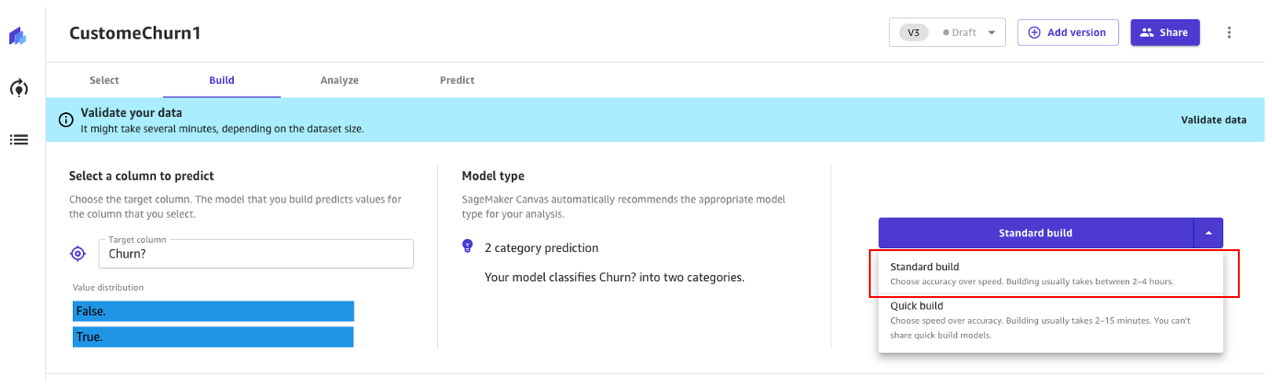
Canvas provides two choices to construct your fashions:
- Customary construct – Builds one of the best mannequin from an optimized course of the place pace is exchanged for higher accuracy. It makes use of Auto-ML, which automates numerous duties of ML, together with mannequin choice, making an attempt numerous algorithms related to your ML use case, hyperparameter tuning, and creating mannequin explainability reviews.
- Fast construct – Builds a easy mannequin in a fraction of the time in comparison with a normal construct, however accuracy is exchanged for pace. Fast mannequin is helpful when iterating to extra shortly perceive the impression of information modifications to your mannequin accuracy.
Let’s proceed utilizing a normal construct method.
Customary construct
As we noticed earlier than, the usual construct builds one of the best mannequin from an optimized course of to maximise accuracy.
The construct course of for our churn mannequin takes round 45 minutes. Throughout this time, Canvas assessments a whole bunch of candidate pipelines, choosing the right mannequin. Within the following screenshot, we will see the anticipated construct time and progress.
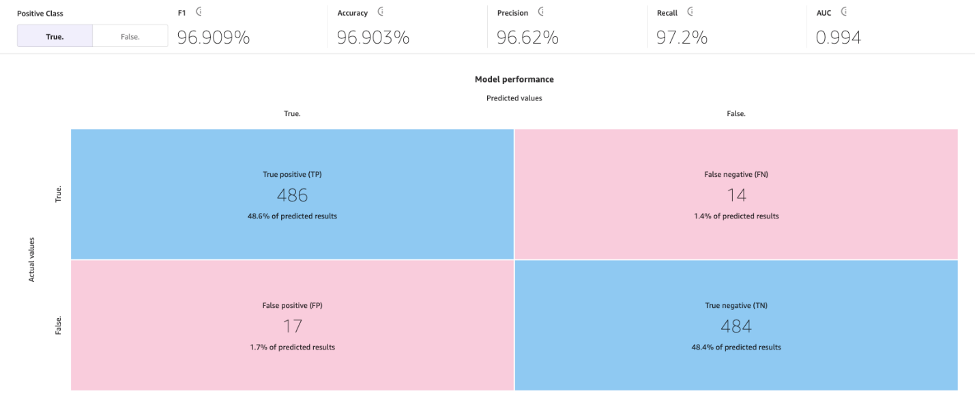
With the usual construct course of, our ML mannequin has improved our mannequin accuracy to 96.903%, which is a major enchancment.

Discover superior metrics
Let’s discover the mannequin utilizing the Superior metrics tab. On the Scoring tab, select Superior metrics.

This web page will present the next confusion matrix collectively with the superior metrics: F1 rating, accuracy, precision, recall, F1 rating, and AUC.
Generate predictions
Now that the metrics look good, we will carry out an interactive prediction on the Predict tab, both in a batch or single (real-time) prediction.
Now we have two choices:
- Use this mannequin to run to run batch or single predictions
- Ship the mannequin to Amazon Sagemaker Studio to share with information scientists
Clear up
To keep away from incurring future session charges, log off of SageMaker Canvas.

Conclusion
SageMaker Canvas gives highly effective instruments that allow you to construct and assess the accuracy of fashions, enhancing their efficiency with out the necessity for coding or specialised information science and ML experience. As we now have seen within the instance by means of the creation of a buyer churn mannequin, by combining these instruments with each a data-centric and a model-centric method utilizing superior metrics, enterprise analysts can create and consider prediction fashions. With a visible interface, you’re additionally empowered to generate correct ML predictions by yourself. We encourage you to undergo the references and see what number of of those ideas may apply in different sorts of ML issues.
References
Concerning the Authors
 Marcos is an AWS Sr. Machine Studying Options Architect primarily based in Florida, US. In that position, he’s answerable for guiding and helping US startup organizations of their technique in direction of the cloud, offering steerage on easy methods to handle high-risk points and optimize their machine studying workloads. He has greater than 25 years of expertise with expertise, together with cloud answer improvement, machine studying, software program improvement, and information middle infrastructure.
 Indrajit is an AWS Enterprise Sr. Options Architect. In his position, he helps prospects obtain their enterprise outcomes by means of cloud adoption. He designs fashionable utility architectures primarily based on microservices, serverless, APIs, and event-driven patterns. He works with prospects to comprehend their information analytics and machine studying targets by means of adoption of DataOps and MLOps practices and options. Indrajit speaks usually at AWS public occasions like summits and ASEAN workshops, has printed a number of AWS weblog posts, and developed customer-facing technical workshops centered on information and machine studying on AWS.

