Generative AI has change into a typical instrument for enhancing and accelerating the inventive course of throughout numerous industries, together with leisure, promoting, and graphic design. It allows extra customized experiences for audiences and improves the general high quality of the ultimate merchandise.
One vital good thing about generative AI is creating distinctive and customized experiences for customers. For instance, generative AI is utilized by streaming providers to generate customized film titles and visuals to extend viewer engagement and construct visuals for titles based mostly on a person’s viewing historical past and preferences. The system then generates hundreds of variations of a title’s art work and checks them to find out which model most attracts the person’s consideration. In some instances, customized art work for TV collection considerably elevated clickthrough charges and think about charges as in comparison with reveals with out customized art work.
On this put up, we exhibit how you need to use generative AI fashions like Secure Diffusion to construct a customized avatar resolution on Amazon SageMaker and save inference value with multi-model endpoints (MMEs) on the identical time. The answer demonstrates how, by importing 10–12 pictures of your self, you possibly can fine-tune a customized mannequin that may then generate avatars based mostly on any textual content immediate, as proven within the following screenshots. Though this instance generates customized avatars, you possibly can apply the approach to any inventive artwork era by fine-tuning on particular objects or kinds.
 |
Resolution overview
The next structure diagram outlines the end-to-end resolution for our avatar generator.
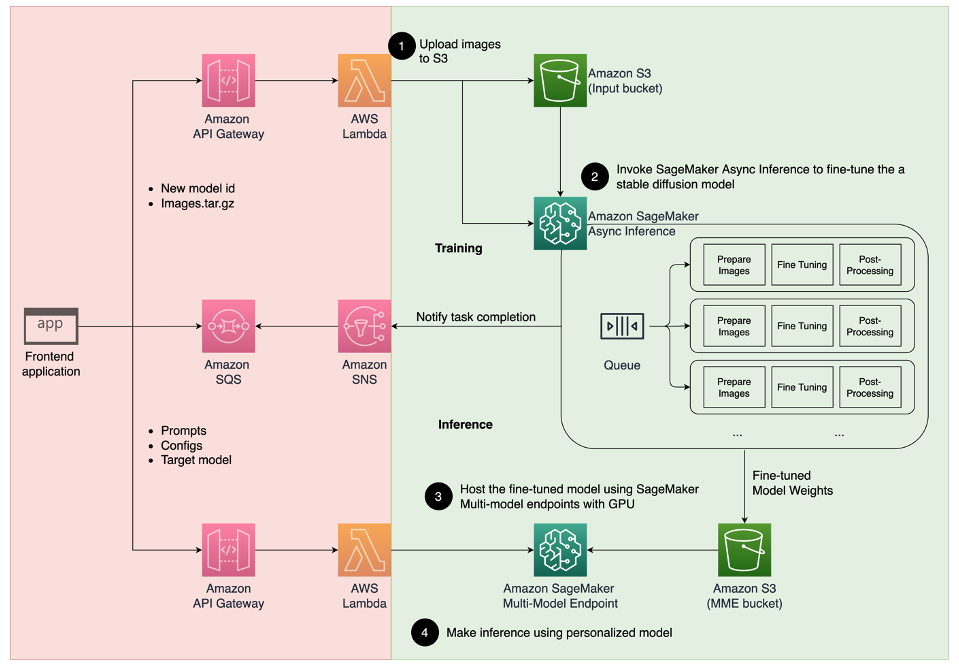
The scope of this put up and the instance GitHub code we offer focus solely on the mannequin coaching and inference orchestration (the inexperienced part within the previous diagram). You possibly can reference the complete resolution structure and construct on prime of the instance we offer.
Mannequin coaching and inference will be damaged down into 4 steps:
- Add pictures to Amazon Simple Storage Service (Amazon S3). On this step, we ask you to offer a minimal of 10 high-resolution pictures of your self. The extra pictures, the higher the end result, however the longer it is going to take to coach.
- High quality-tune a Secure Diffusion 2.1 base mannequin utilizing SageMaker asynchronous inference. We clarify the rationale for utilizing an inference endpoint for coaching later on this put up. The fine-tuning course of begins with making ready the pictures, together with face cropping, background variation, and resizing for the mannequin. Then we use Low-Rank Adaptation (LoRA), a parameter-efficient fine-tuning approach for big language fashions (LLMs), to fine-tune the mannequin. Lastly, in postprocessing, we bundle the fine-tuned LoRA weights with the inference script and configuration information (tar.gz) and add them to an S3 bucket location for SageMaker MMEs.
- Host the fine-tuned fashions utilizing SageMaker MMEs with GPU. SageMaker will dynamically load and cache the mannequin from the Amazon S3 location based mostly on the inference visitors to every mannequin.
- Use the fine-tuned mannequin for inference. After the Amazon Simple Notification Service (Amazon SNS) notification indicating the fine-tuning is shipped, you possibly can instantly use that mannequin by supplying a
target_modelparameter when invoking the MME to create your avatar.
We clarify every step in additional element within the following sections and stroll by among the pattern code snippets.
Put together the pictures
To realize the most effective outcomes from fine-tuning Secure Diffusion to generate pictures of your self, you sometimes want to offer a big amount and number of pictures of your self from totally different angles, with totally different expressions, and in numerous backgrounds. Nevertheless, with our implementation, now you can obtain a high-quality end result with as few as 10 enter pictures. We’ve additionally added automated preprocessing to extract your face from every photograph. All you want is to seize the essence of the way you look clearly from a number of views. Embrace a front-facing photograph, a profile shot from all sides, and pictures from angles in between. You must also embody pictures with totally different facial expressions like smiling, frowning, and a impartial expression. Having a mixture of expressions will enable the mannequin to raised reproduce your distinctive facial options. The enter pictures dictate the standard of avatar you possibly can generate. To ensure that is accomplished correctly, we advocate an intuitive front-end UI expertise to information the person by the picture seize and add course of.
The next are instance selfie pictures at totally different angles with totally different facial expressions.

High quality-tune a Secure Diffusion mannequin
After the pictures are uploaded to Amazon S3, we are able to invoke the SageMaker asynchronous inference endpoint to begin our coaching course of. Asynchronous endpoints are meant for inference use instances with massive payloads (as much as 1 GB) and lengthy processing instances (as much as 1 hour). It additionally offers a built-in queuing mechanism for queuing up requests, and a job completion notification mechanism by way of Amazon SNS, along with different native options of SageMaker internet hosting reminiscent of auto scaling.
Though fine-tuning will not be an inference use case, we selected to put it to use right here in lieu of SageMaker coaching jobs attributable to its built-in queuing and notification mechanisms and managed auto scaling, together with the flexibility to scale right down to 0 cases when the service will not be in use. This enables us to simply scale the fine-tuning service to numerous concurrent customers and eliminates the necessity to implement and handle the extra elements. Nevertheless, it does include the downside of the 1 GB payload and 1 hour most processing time. In our testing, we discovered that 20 minutes is enough time to get moderately good outcomes with roughly 10 enter pictures on an ml.g5.2xlarge occasion. Nevertheless, SageMaker coaching can be the beneficial method for larger-scale fine-tuning jobs.
To host the asynchronous endpoint, we should full a number of steps. The primary is to outline our mannequin server. For this put up, we use the Large Model Inference Container (LMI). LMI is powered by DJL Serving, which is a high-performance, programming language-agnostic mannequin serving resolution. We selected this selection as a result of the SageMaker managed inference container already has lots of the coaching libraries we want, reminiscent of Hugging Face Diffusers and Accelerate. This enormously reduces the quantity of labor required to customise the container for our fine-tuning job.
The next code snippet reveals the model of the LMI container we utilized in our instance:
Along with that, we have to have a serving.properties file that configures the serving properties, together with the inference engine to make use of, the placement of the mannequin artifact, and dynamic batching. Lastly, we will need to have a mannequin.py file that hundreds the mannequin into the inference engine and prepares the info enter and output from the mannequin. In our instance, we use the mannequin.py file to spin up the fine-tuning job, which we clarify in better element in a later part. Each the serving.properties and mannequin.py information are offered within the training_service folder.
The following step after defining our mannequin server is to create an endpoint configuration that defines how our asynchronous inference will likely be served. For our instance, we’re simply defining the utmost concurrent invocation restrict and the output S3 location. With the ml.g5.2xlarge occasion, now we have discovered that we’re capable of fine-tune as much as two fashions concurrently with out encountering an out-of-memory (OOM) exception, and subsequently we set max_concurrent_invocations_per_instance to 2. This quantity could should be adjusted if we’re utilizing a distinct set of tuning parameters or a smaller occasion sort. We advocate setting this to 1 initially and monitoring the GPU reminiscence utilization in Amazon CloudWatch.
Lastly, we create a SageMaker mannequin that packages the container info, mannequin information, and AWS Identity and Access Management (IAM) position right into a single object. The mannequin is deployed utilizing the endpoint configuration we outlined earlier:
When the endpoint is prepared, we use the next pattern code to invoke the asynchronous endpoint and begin the fine-tuning course of:
For extra particulars about LMI on SageMaker, discuss with Deploy large models on Amazon SageMaker using DJLServing and DeepSpeed model parallel inference.
After invocation, the asynchronous endpoint begins queueing our fine-tuning job. Every job runs by the next steps: put together the pictures, carry out Dreambooth and LoRA fine-tuning, and put together the mannequin artifacts. Let’s dive deeper into the fine-tuning course of.
Put together the pictures
As we talked about earlier, the standard of enter pictures straight impacts the standard of fine-tuned mannequin. For the avatar use case, we would like the mannequin to give attention to the facial options. As a substitute of requiring customers to offer rigorously curated pictures of actual dimension and content material, we implement a preprocessing step utilizing pc imaginative and prescient methods to alleviate this burden. Within the preprocessing step, we first use a face detection mannequin to isolate the biggest face in every picture. Then we crop and pad the picture to the required dimension of 512 x 512 pixels for our mannequin. Lastly, we phase the face from the background and add random background variations. This helps spotlight the facial options, permitting our mannequin to study from the face itself slightly than the background. The next pictures illustrate the three steps on this course of.
 |
 |
 |
| Step 1: Face detection utilizing pc imaginative and prescient | Step 2: Crop and pad the picture to 512 x 512 pixels | Step 3 (Elective): Section and add background variation |
Dreambooth and LoRA fine-tuning
For fine-tuning, we mixed the methods of Dreambooth and LoRA. Dreambooth means that you can personalize your Secure Diffusion mannequin, embedding a topic into the mannequin’s output area utilizing a singular identifier and increasing the mannequin’s language imaginative and prescient dictionary. It makes use of a technique known as prior preservation to protect the mannequin’s semantic information of the category of the topic, on this case an individual, and use different objects within the class to enhance the ultimate picture output. That is how Dreambooth can obtain high-quality outcomes with only a few enter pictures of the topic.
The next code snippet reveals the inputs to our coach.py class for our avatar resolution. Discover we selected <<TOK>> because the distinctive identifier. That is purposely accomplished to keep away from selecting a reputation which will already be within the mannequin’s dictionary. If the title already exists, the mannequin has to unlearn after which relearn the topic, which can result in poor fine-tuning outcomes. The topic class is about to “a photograph of individual”, which allows prior preservation by first producing pictures of individuals to feed in as extra inputs throughout the fine-tuning course of. It will assist scale back overfitting as mannequin tries to protect the earlier information of an individual utilizing the prior preservation technique.
Plenty of memory-saving choices have been enabled within the configuration, together with fp16, use_8bit_adam, and gradient accumulation. This reduces the reminiscence footprint to beneath 12 GB, which permits for fine-tuning of as much as two fashions concurrently on an ml.g5.2xlarge occasion.
LoRA is an environment friendly fine-tuning approach for LLMs that freezes a lot of the weights and attaches a small adapter community to particular layers of the pre-trained LLM, permitting for sooner coaching and optimized storage. For Secure Diffusion, the adapter is connected to the textual content encoder and U-Internet elements of the inference pipeline. The textual content encoder converts the enter immediate to a latent house that’s understood by the U-Internet mannequin, and the U-Internet mannequin makes use of the latent which means to generate the picture within the subsequent diffusion course of. The output of the fine-tuning is simply the text_encoder and U-Internet adapter weights. At inference time, these weights will be reattached to the bottom Secure Diffusion mannequin to breed the fine-tuning outcomes.
The figures under are element diagram of LoRA fine-tuning offered by unique writer: Cheng-Han Chiang, Yung-Sung Chuang, Hung-yi Lee, “AACL_2022_tutorial_PLMs,” 2022
 |
 |
By combining each strategies, we have been capable of generate a customized mannequin whereas tuning an order-of-magnitude fewer parameters. This resulted in a a lot sooner coaching time and lowered GPU utilization. Moreover, storage was optimized with the adapter weight being solely 70 MB, in comparison with 6 GB for a full Secure Diffusion mannequin, representing a 99% dimension discount.
Put together the mannequin artifacts
After fine-tuning is full, the postprocessing step will TAR the LoRA weights with the remainder of the mannequin serving information for NVIDIA Triton. We use a Python backend, which implies the Triton config file and the Python script used for inference are required. Observe that the Python script must be named mannequin.py. The ultimate mannequin TAR file ought to have the next file construction:
Host the fine-tuned fashions utilizing SageMaker MMEs with GPU
After the fashions have been fine-tuned, we host the customized Secure Diffusion fashions utilizing a SageMaker MME. A SageMaker MME is a strong deployment characteristic that enables internet hosting a number of fashions in a single container behind a single endpoint. It routinely manages visitors and routing to your fashions to optimize useful resource utilization, save prices, and decrease operational burden of managing hundreds of endpoints. In our instance, we run on GPU cases, and SageMaker MMEs assist GPU utilizing Triton Server. This lets you run a number of fashions on a single GPU gadget and make the most of accelerated compute. For extra element on how you can host Secure Diffusion on SageMaker MMEs, discuss with Create high-quality images with Stable Diffusion models and deploy them cost-efficiently with Amazon SageMaker.
For our instance, we made extra optimization to load the fine-tuned fashions sooner throughout chilly begin conditions. That is potential due to LoRA’s adapter design. As a result of the bottom mannequin weights and Conda environments are the identical for all fine-tuned fashions, we are able to share these frequent sources by pre-loading them onto the internet hosting container. This leaves solely the Triton config file, Python backend (mannequin.py), and LoRA adaptor weights to be dynamically loaded from Amazon S3 after the primary invocation. The next diagram offers a side-by-side comparability.

This considerably reduces the mannequin TAR file from roughly 6 GB to 70 MB, and subsequently is far sooner to load and unpack. To do the preloading in our instance, we created a utility Python backend mannequin in fashions/model_setup. The script merely copies the bottom Secure Diffusion mannequin and Conda surroundings from Amazon S3 to a typical location to share throughout all of the fine-tuned fashions. The next is the code snippet that performs the duty:
Then every fine-tuned mannequin will level to the shared location on the container. The Conda surroundings is referenced within the config.pbtxt.
The Secure Diffusion base mannequin is loaded from the initialize() operate of every mannequin.py file. We then apply the customized LoRA weights to the unet and text_encoder mannequin to breed every fine-tuned mannequin:
 Simon Zamarin is an AI/ML Options Architect whose foremost focus helps clients extract worth from their knowledge property. In his spare time, Simon enjoys spending time with household, studying sci-fi, and dealing on numerous DIY home tasks.
 Saurabh Trikande is a Senior Product Supervisor for Amazon SageMaker Inference. He’s enthusiastic about working with clients and is motivated by the objective of democratizing machine studying. He focuses on core challenges associated to deploying advanced ML functions, multi-tenant ML fashions, value optimizations, and making deployment of deep studying fashions extra accessible. In his spare time, Saurabh enjoys mountaineering, studying about progressive applied sciences, following TechCrunch and spending time along with his household.